How to Set Up and Manage Leads in the ASIO CRM
Import or create leads, organize the sales pipeline, contact customers, schedule meetings and manage follow-up from the ASIO CRM.
Last updated:
The ASIO CRM keeps every lead, conversation, meeting, status, owner, product and next action in one place. The two CRM tutorials form one workflow: Part 1 sets up the database and explains the lead profile; Part 2 shows how to organize, contact, schedule and move leads through the pipeline.
Before you begin
- Decide whether you will connect a Google Sheet, upload a CSV file, or begin with an empty CRM.
- If you want Google Sheet synchronization, connect the correct Google Drive account to ASIO first.
- Connect Google Calendar if meetings created in the CRM should also appear in the business calendar.
- Prepare clean lead data with, at minimum, a real name and a valid phone number or email address.
- Know which team member should own each lead and which products or services the team sells.
Choose how leads enter the CRM
Open CRM
Select CRM in the ASIO sidebar, then open Lead Management.
Choose an import method
Connect or select a Google Sheet for an ongoing lead source, or upload a supported file for a one-time import.
Continue without an import when necessary
Start with an empty CRM if you want to create the first leads manually.
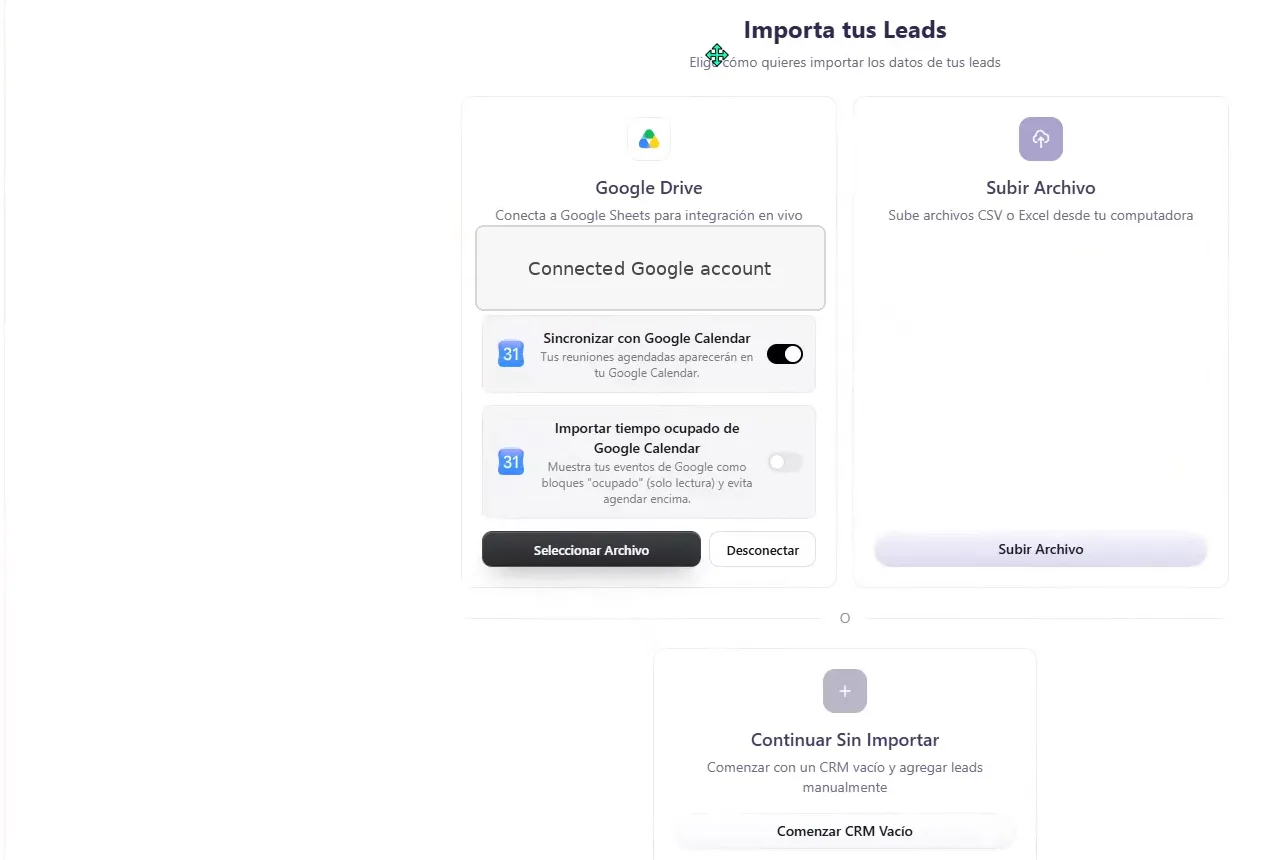
Figure 65. Connect a Google Sheet, upload a file, or continue with a new CRM.
Understand the sales pipeline
Flow view organizes leads by their current stage. The tutorial shows the stages New Lead, Contacted, Meeting Scheduled, In Progress, Sales, Follow-up and Completed. A lead card should move only when the real customer status changes.
Read the columns from left to right
Use the stage names as a shared sales process rather than personal labels.
Open a lead card
Select the card to see its complete profile and activity.
Use List view when useful
Switch views when a table-style review is easier than following the pipeline visually.
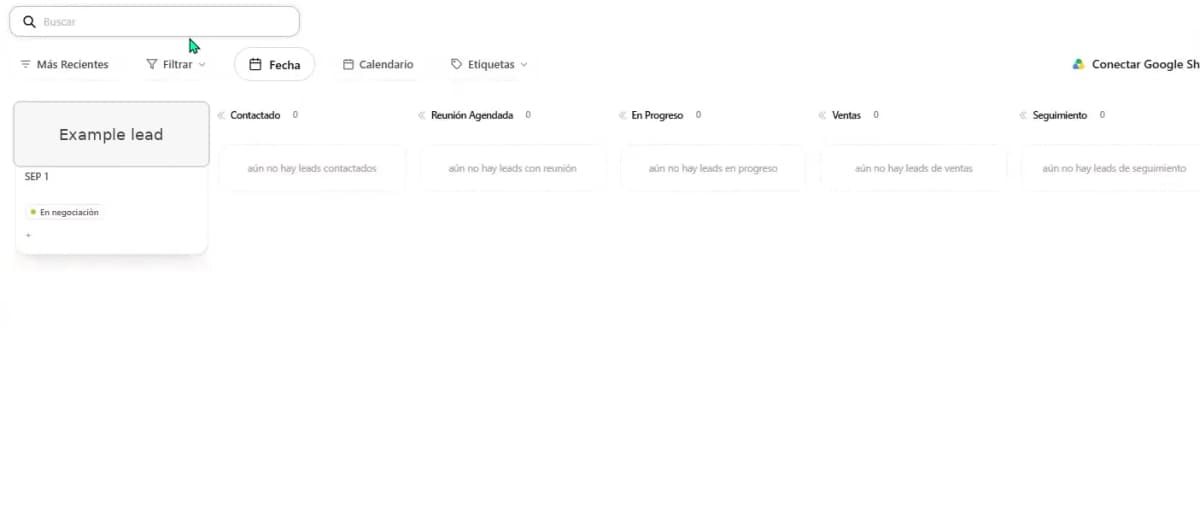
Figure 66. Use Flow view to see where every lead is in the sales process.
Find the leads that need attention
The controls above the pipeline help the team reduce a large database to the leads that matter now. Search for a specific person, sort by recency, apply filters, choose a date range, review the meeting calendar, or filter by labels.

Create and manage labels
Labels add a second layer of organization without replacing the pipeline stage. Use them for useful distinctions such as hot lead, warm lead, VIP, payment due, or another category the team needs to see quickly.
Open Labels
Select Labels from the CRM toolbar and open the label manager.
Create a clear label
Choose a short name and a color that the whole team will interpret the same way.
Edit or delete carefully
Changing a shared label affects how it appears across the CRM; deleting one removes it from the leads that use it.
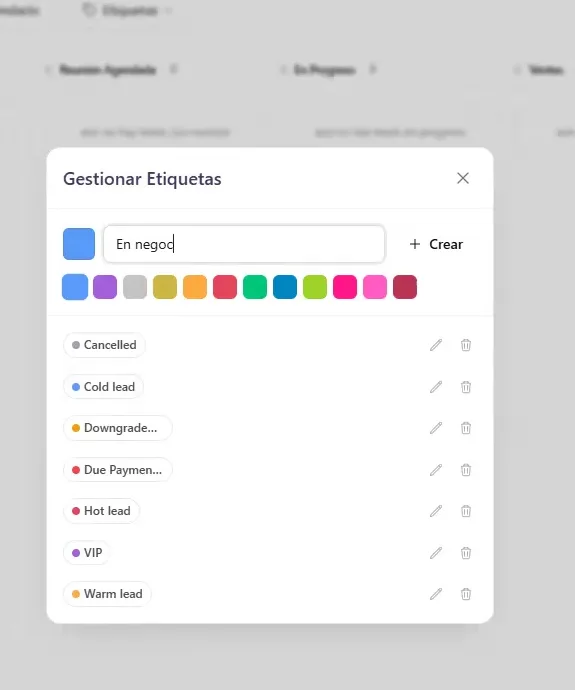
Figure 68. Create, color, edit or remove the labels used to organize leads.
Create a lead manually
Select Create Lead
Use the action at the top of the CRM when a contact did not arrive through an integration or import.
Enter the contact fields
Add the name, surname, email, phone number, website, company, source, business type and useful notes when available.
Save only usable data
Check the phone number, email address and source before creating the record.
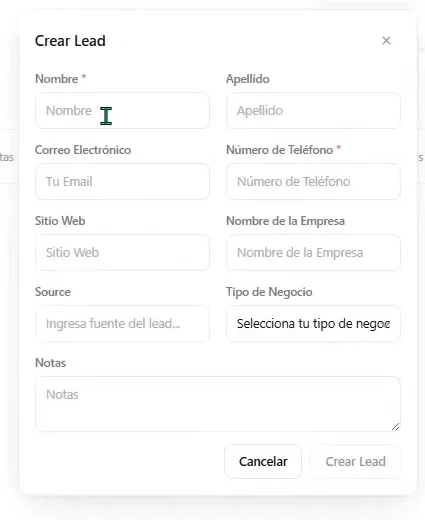
Figure 69. Add an individual contact with the Create Lead form.
Review and maintain the lead profile
The lead profile combines customer details with the sales pipeline. It shows contact information, registration date, source, company, business type, current stage, selected product, responsible team member and labels. It also contains notes and the available ASIO Voice and ASIO Messages history.
Confirm the details
Correct inaccurate contact or business information with Edit.
Choose the product or service
Record what the lead is considering so the team can continue the right conversation.
Assign an owner
Select the person responsible for the next action; avoid leaving active leads unassigned.
Add the right labels
Use labels for priority or context while keeping the stage accurate.
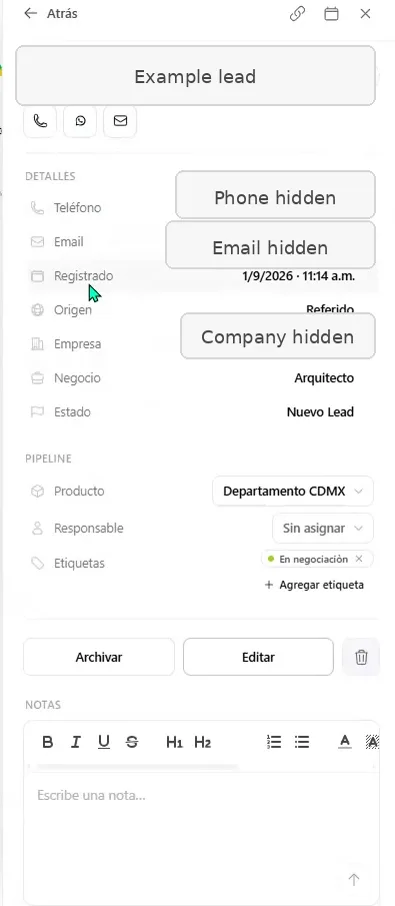
Figure 70. Review the lead details, pipeline fields, owner, labels and notes in one profile.
Write notes and review activity
Notes should explain what happened and what must happen next. Below the note editor, the lead profile keeps service activity, including ASIO Voice, ASIO Messages and the chronological CRM history shown in the tutorial.
Write a useful note
Record the customer's need, objection, decision or promise, not only that a call occurred.
Check the activity history
Use the timestamped record to see what changed and who handled the lead.
Refresh connected activity
When an expected call or message is missing, refresh the relevant ASIO Voice or ASIO Messages section.
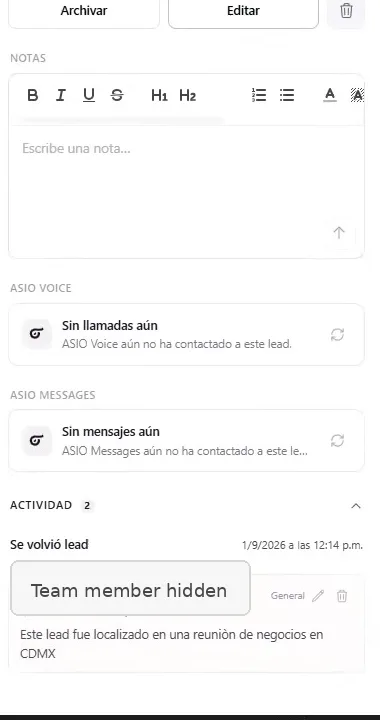
Figure 71. Keep notes, connected-agent activity and the CRM history together.
Contact a lead from the CRM
The lead card and profile provide quick contact actions. Depending on the connected services and available contact data, the tutorial shows phone, WhatsApp and email actions. Calling opens the ASIO dialer with the lead's number ready.
Select the contact action
Choose phone, WhatsApp or email from the lead card or profile.
Confirm the destination
Verify that the number or address belongs to the intended lead before sending or calling.
Update the record afterward
Add the outcome, move the stage when appropriate, and set the next follow-up.
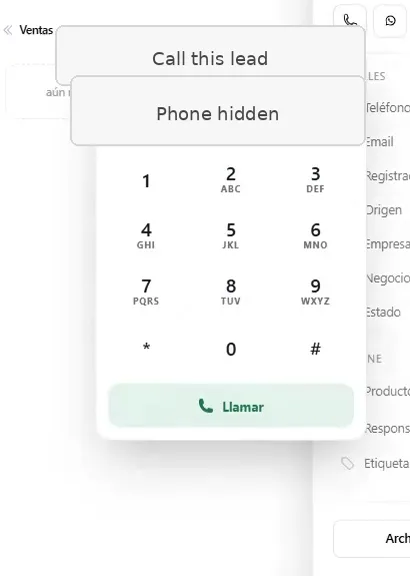
Figure 72. Start a normal call from the CRM with the lead's number ready in the dialer.
Use the CRM Actions menu safely
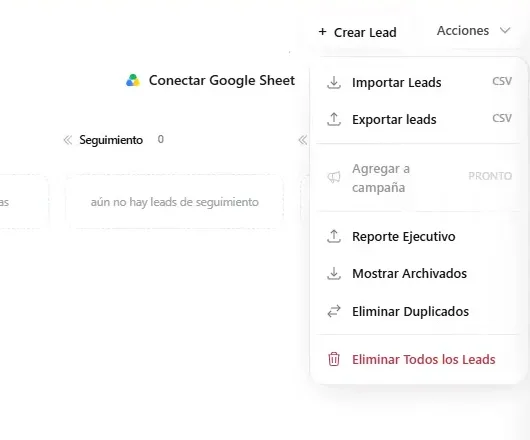
The Actions menu contains database-level tools. The tutorial shows Import Leads, Export Leads, an executive report, archived leads, duplicate removal and deleting all leads. Some actions affect the entire database, not only the card currently open.
Schedule a meeting and synchronize the calendar
Open the meeting action
Use the calendar control from the lead record or select Schedule Meeting in the follow-up options.
Choose the date and time
Confirm the correct day, hour, time zone and customer before saving.
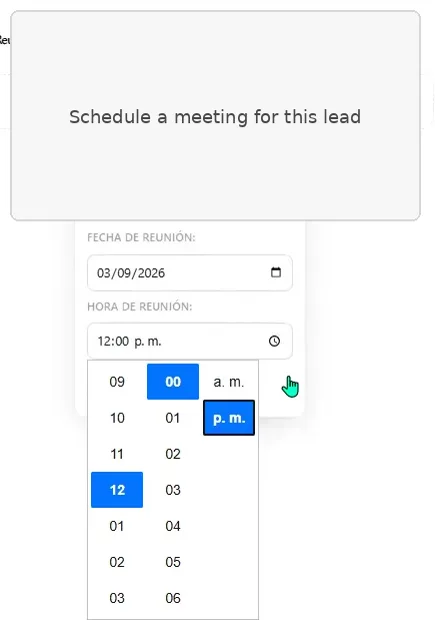
Figure 74. Select the date and time for the lead meeting. Check the calendar
When Google Calendar is connected, confirm that the new meeting appears in the intended business calendar.
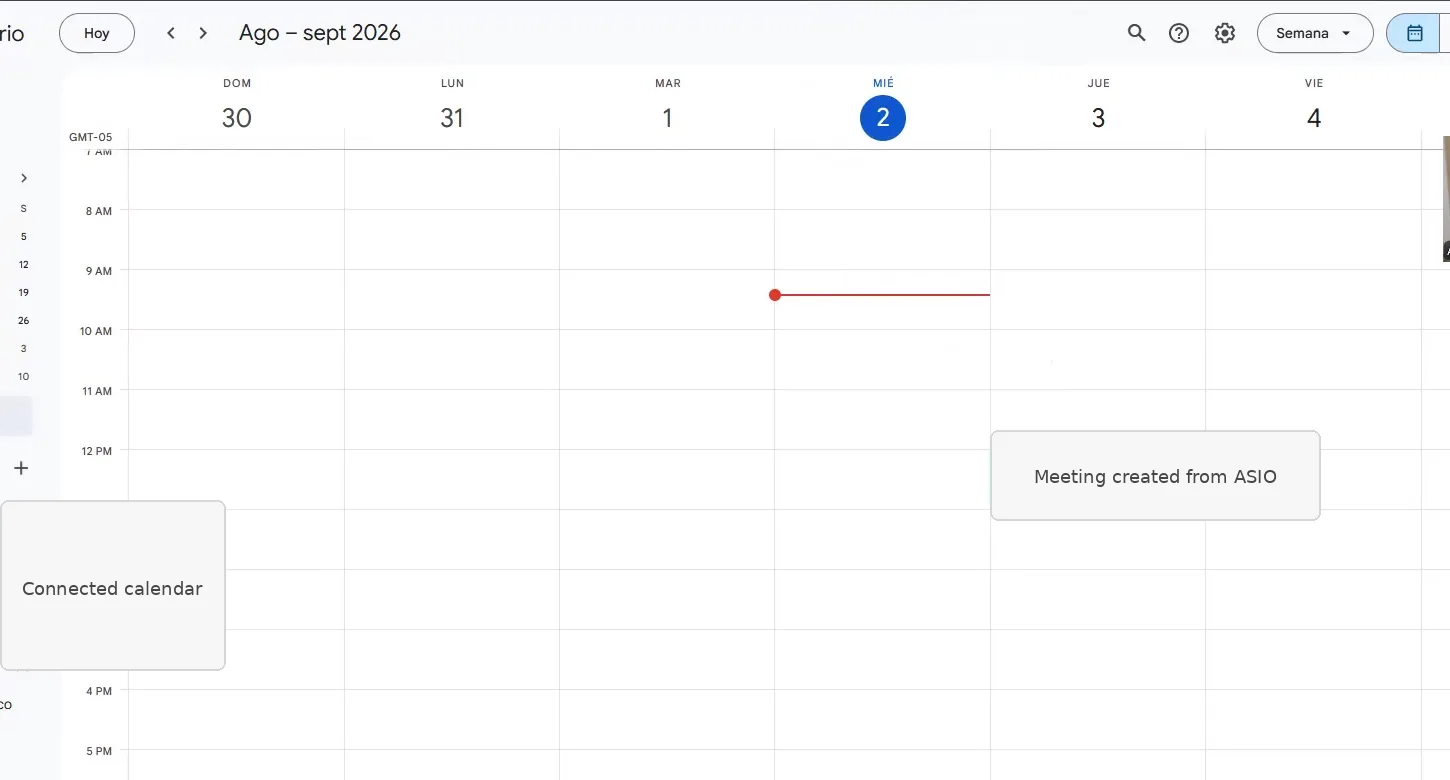
Figure 75. Confirm that the meeting created in ASIO appears in the connected Google Calendar. Update attendance
After the meeting, record whether the lead attended and move the card to the correct stage.
Work with lead cards and bulk actions
A lead card provides fast access to the most common actions. Selecting a card also opens a bulk-action bar. In the tutorial, the available actions include Call with AI, Assign, Move, Status, WhatsApp, Duplicate and Delete.
Select the intended lead or leads
Confirm the selection count before applying an action.
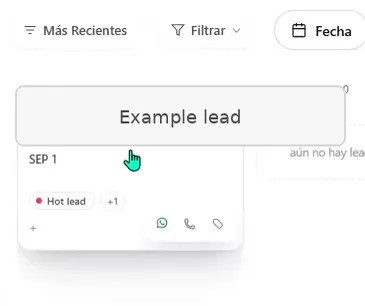
Figure 76. Use the quick actions on a lead card for contact and lead organization. Choose the operational action
Assign an owner, move the stage, update status, start WhatsApp, call with AI, or duplicate the selected record only when necessary.
Set a real next step
The follow-up menu shown in the tutorial includes 24-, 48- and 72-hour follow-up, Schedule Meeting and Waiting for Response.
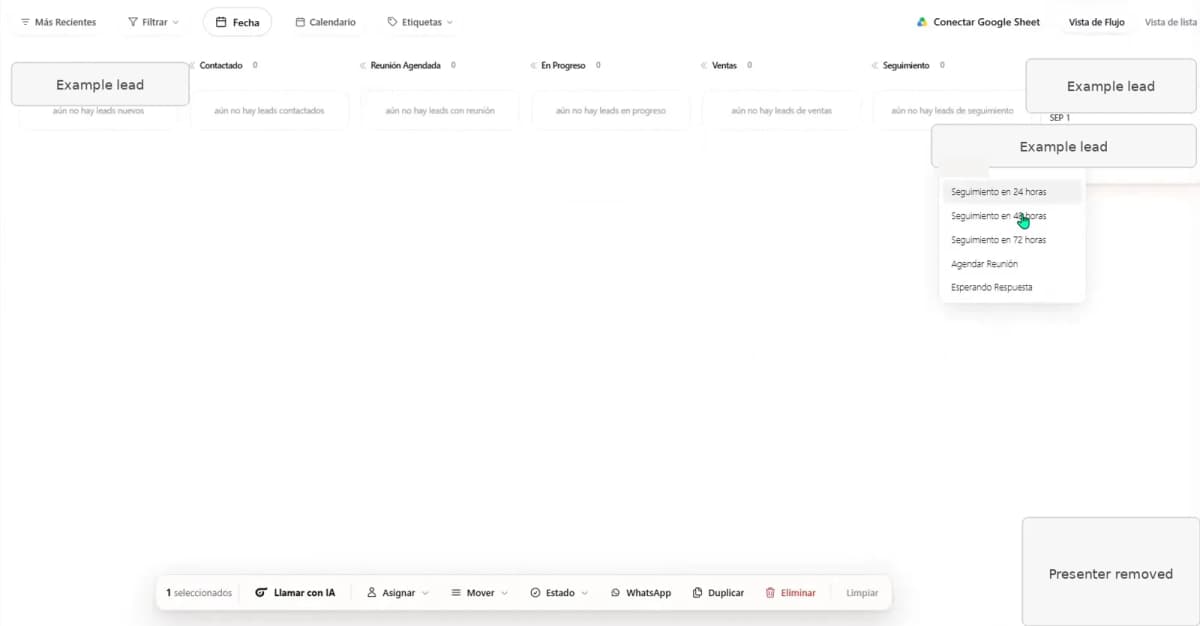
Figure 77. Apply a team action and choose a concrete follow-up for the selected lead.
Move a lead only when the sales status changes
Moving a lead can trigger an additional question. In the tutorial, moving the card toward In Progress asks which product or service interests the lead. Choose the correct item and value so the pipeline reflects the real opportunity.
Move the card to the correct stage
Use drag and drop or the Move action only after a real customer interaction or outcome.
Select the relevant product
Choose the offer discussed with the customer rather than a generic placeholder.
Check the updated card
Confirm the stage, product, label, attendance, owner and next action after the move.
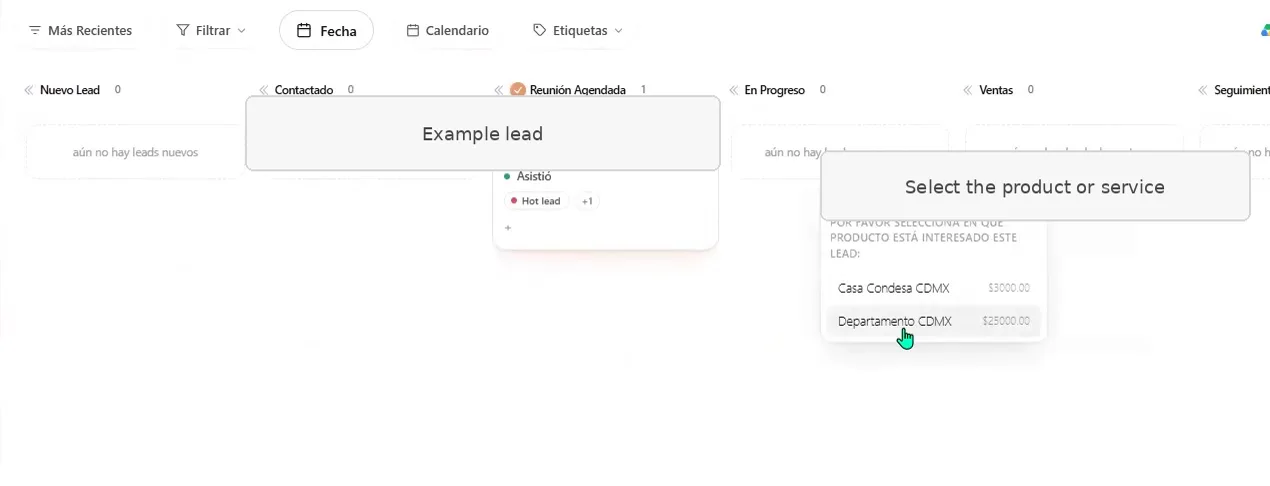
Figure 78. Select the relevant product or service when the pipeline move requires it.
A simple daily CRM workflow
Open the leads that need attention
Use search, filters, labels and follow-up timing to create today's working list.
Confirm ownership
Every active lead should have one responsible team member.
Contact the customer
Call, message or email from the lead record when the connection is available.
Record the outcome
Write a useful note immediately after the interaction.
Update the opportunity
Choose the correct stage, status, product and labels.
Set the next action
Schedule a meeting or choose a specific follow-up window.
Review completed and inactive leads
Archive or close records only when the customer status is clear.
Common problems
- New Google Sheet rows do not appear.
- Confirm that the intended Sheet and Google account are connected, preserve the required column structure, and refresh the CRM.
- Imported leads appear twice.
- Check whether the same file or Sheet was imported more than once; export a backup, then review the duplicate-removal tool carefully.
- A lead cannot be contacted.
- Verify that the profile contains a valid phone number or email and that the required ASIO Voice, WhatsApp or email connection is active.
- A meeting does not appear in Google Calendar.
- Confirm the Calendar integration, the connected Google account and the calendar synchronization settings.
- A lead is in the wrong column.
- Move it to the stage that matches the real sales status and update the product, attendance and follow-up if prompted.
- No one follows up.
- Assign one owner, add the interaction note, and choose a specific follow-up time instead of leaving the lead unassigned.
CRM operating checklist
Check you are done
- The correct Google Sheet or import source is connected.
- The pipeline stages have one shared meaning for the whole team.
- Useful labels are defined and unnecessary labels are removed carefully.
- Every active lead has valid contact data and one responsible owner.
- The selected product or service reflects the real opportunity.
- Every meaningful interaction has a note or connected activity record.
- Meetings appear in the intended calendar and attendance is updated.
- Each active lead has a specific next follow-up or waiting status.
- A backup is exported before database-wide cleanup or deletion.
Was this helpful?